
Today we celebrate this blog’s 4th anniversary! So I made this Pink Champagne Cake With a Kombucha budget… hahaha I wanted to make a special cake, but couldn’t justify opening my organic “champagne” bottle that I keep in the fridge, so I decided to try something new and different instead, and use kombucha in the cake batter. I have to say, the cake was delicious, but I’m not sure I really tasted the kombucha that much, haha, but it’s still worth using it I think, and it’s obviously a lot cheaper than champagne!
If you’d like to try something else unusually made with kombucha, check out my Ginger Pear Kombucha Smoothie!
4 years
It’s hard to believe it’s been 4 years because it doesn’t feel like it’s been that long. I’d say more like 2 or 3, because I had no clue what I was doing for the first year or two. It’s been quite a learning curve (still is). I’ve worked on my photography a lot because I believe that appetite starts with the eyes, and a pretty picture always make me hungry. Plus, I really want to demystify the old rumours that healthy food is bland and unappetizing.
2016 was for me a year full of highs and lows, and some extremely lows when my precious Brandy (my 19 and a half year old cat) died suddenly on November 29th. She had suddenly been sick for a few weeks before that, but I never expected her to die until the last 48 hours. That story will be for another time, because it’s still too fresh in my memory, and the gigantic hole in my heart and in my life hasn’t fully healed yet.
So for a fresh start in 2017, I thought I would mark this special occasion on this blog. You probably noticed that I recently updated the logo, colours, and design in this space, started making videos (you can see my first video for my Dairy-Free Lemon Curd, and my second video for my Oat, Coconut, and Cacao Cookies!), and now marking this important milestone. Eyecandypopper has become a part of me, for better or for worse, and I thank you for being part of this journey together. Living a healthy lifestyle includes what we eat but also what we think, so I stay positive despite the sadness. I find joy in even smaller things, and I while I work hard, I also try to slow down and enjoy the moment.
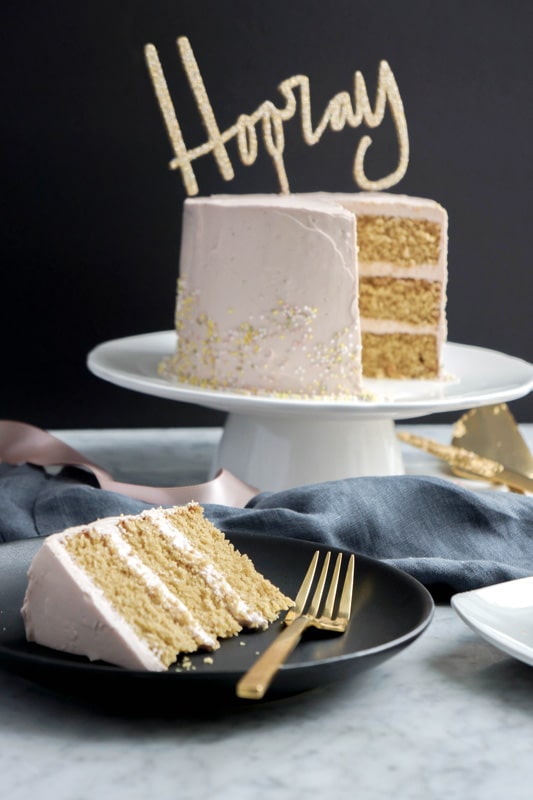

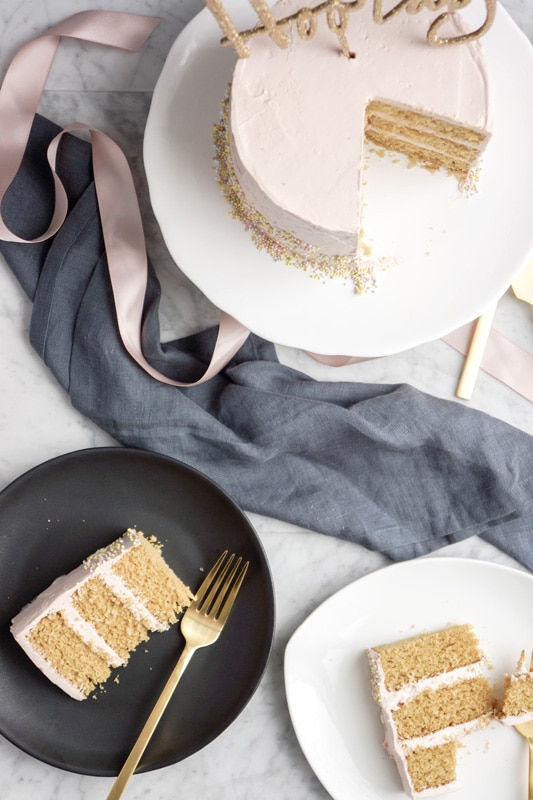
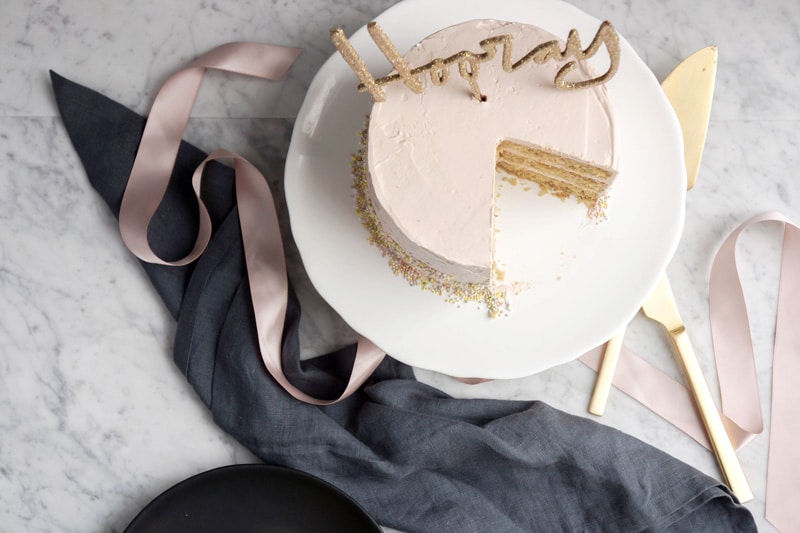
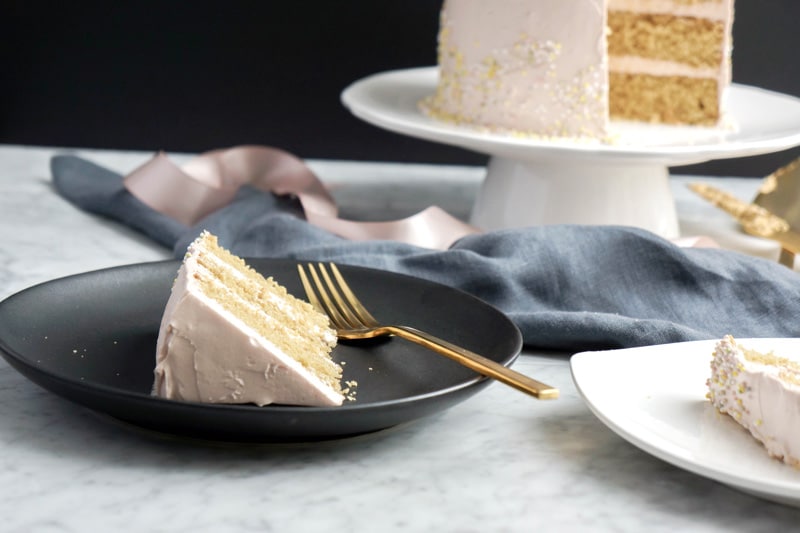
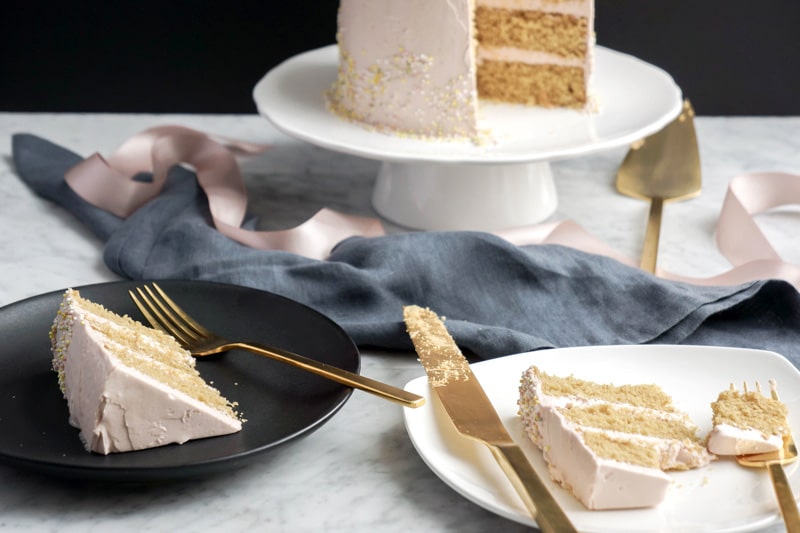
Pink Champagne Cake With a Kombucha Budget
Embracing small occasions, my husband and I also share our anniversary day only a week apart from my blogiversary, so a nice layered cake was needed. I wanted it to be pretty in light pink, with simple decorations. I thought about putting berries on top (always a winner in my book), but remembered I had some organic sprinkles made with natural food colourings that have the lightest and cutest colour palette, so off they went on the sides of the cake!
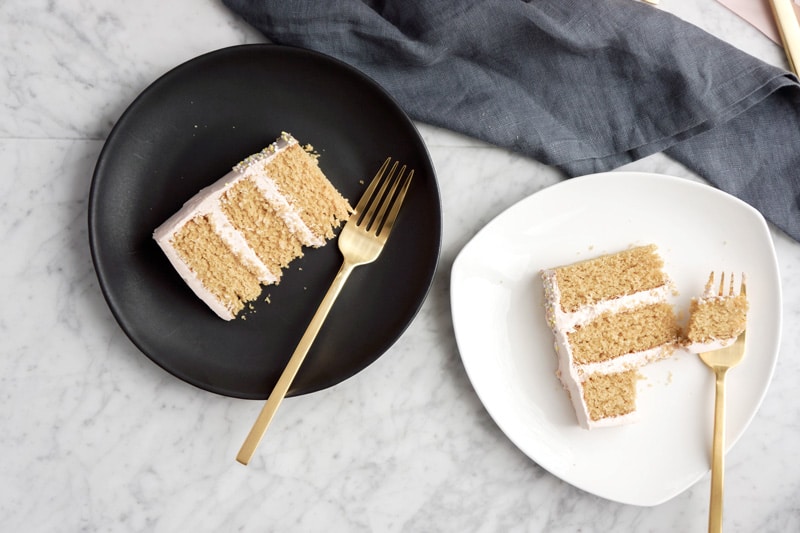
This cake is gluten-free because I used flours that are naturally gluten-free. I also didn’t use any cane sugar in the cake, but rather maple syrup to complement the ginger kombucha.
This cake does taste at its best when it is freshly made, so ideally made and eaten the same day (it’s seriously so moist and light that you wouldn’t know it’s gluten-free!). If you make it ahead, I don’t recommend more than 1 day. Cover the cake layers in plastic wrap or airtight containers to preserve its freshness, and ice the cake a few hours before serving.
Bon appétit!


Olive Oil Pink Champagne Cake With Kombucha | Dairy-Free, Gluten-Free, Low Sugar
Gluten-Free, Dairy-Free and healthy, all in one delicious cake!
Ingredients
Cake
- 1 1/2 cup brown rice flour
- 1/2 cup millet flour
- 1/2 cup tapioca starch this ingredient is critical. If you use a different GF flour, it will not be as soft and moist
- 2 tsp aluminum-free baking powder
- 1 tsp baking soda
- 1/2 tsp sea salt
- 3 organic free-range eggs
- 1 Tbsp pure vanilla extract
- 1/2 cup maple syrup
- 1/3 cup good quality olive oil I promise, it doesn't taste
- 1 cup ginger kombucha open the bottle and let it breathe for a few minutes so that it's not bubbling too much
- 1 tsp apple cider vinegar
Icing
- 368 g organic buttery spread Earth Balance (vegan buttery spread)
- 1/2 cup maple syrup
- 2 tsp vanilla
- 1 Tbsp beet juice
- 2 cups organic icing sugar
- Optional organic sprinkles for decoration
Instructions
- Prepare your cake pans first by cutting rounds of parchment paper to go at the bottom of each pan (either 3 x 6" or 2 x 9"). Set aside. Drizzle a small amount of olive oil and brush it all over the pans (I just use my clean fingers to do that), then put the parchment paper rounds at the bottom. It'll stick to the olive oil, so you can push any air bubbles out. Set aside.
- Preheat the oven to 350F/180C.
- Make the cake. In a large mixing bowl, mix all of the dry ingredients together with a whisk. Then in a medium mixing bowl, whisk the eggs until nice and frothy, then add the olive oil, whisk, and the rest of the ingredients.
- Pour the wet mixture into the dry mixture, and use the whisk to mix gently, and make sure there are no clumps. It might seem a bit wet at first, but it'll thicken in a few minutes while you're whisking clumps out.
- Pour equally into your prepared pans, and bake at 350F/180C for about 22-25 minutes, or until fully cooked throughout (insert a clean butter knife in the middle to test it. If it comes out clean, it's ready. If some uncooked mixture is on your knife, continue baking for 3-5 more minutes.
- Do not overcook or the cake will be too dry.
- Remove from oven and let cool down for 10 minutes or so, then run a knife around the edges of the pan to dislodge the cakes, and carefully flip over on cooling racks to let the cakes cool down completely.
- Make the icing. Using a hand beater or a stand mixer, beat the vegan buttery spread until creamy, then add the maple syrup and beat until mixed in. Add the vanilla and beet juice and mixed in until creamy. Add the icing sugar, 1 cup at a time and put it through a sieve to make sure there are no clumps. It's an extra step that will save you in the end because clumps are hard to smooth later. Beat in the 2nd cup of icing sugar, and keep beating until nice and fluffy. Set aside to cool down before using. Don't put in the fridge if you're using that same day, or it'll harden.
- When your cakes are completely cooled down, you can use a large sharp bread knife or cake knife to cut of the rounded tops of each cakes, if you wish to have a more visually appealing cake, but if it doesn't matter, no worries about it. haha
- Always put the cut side of the layers down, then add some icing on top and spread. Continue with the other 1 or 2 layers, then use a bit of icing to smooth all around the sides of the cake, kind of like a naked cake. This is just to smooth everything and set the crumbs in. Put in the fridge to set for 20-30 minutes, then continue with the final coat of icing on top and all around, smoothing everything. I use some pastry utensils, but a dull butter knife works well too.
- If you are using sprinkles, carefully (!!!) put a small amount at a time in your hand and gently throw them on the sides. Don't take too much at once and be careful, those little suckers fly all over the place (mine are round)! Then put your cake in the fridge for another 20-30 minutes, just to set everything.
- Ready to serve and enjo
Recipe Notes
Makes 1 cake (6" x 3 layers or 9" x 2 layers)
Note: I do not believe anyone should worry about counting calories, but here is the nutritional information for one serving
Calories: 399kcal | Fat: 9g | Saturated fat: 1g | Cholesterol: 49mg | Sodium: 269mg | Potassium: 278mg | Carbohydrates: 74g | Fiber: 1g | Sugar: 43g | Protein: 4g | Vitamin A: 70% | Calcium: 88% | Iron: 1.1%
This sounds wonderful! Where did you get the sprinkles? I will be making this soon, most definitely.
And Happy Anniversary/Blogversary
Thanks! I got the sprinkles at my local health food store. They’re available online too. I just added an affiliate link for Amazon in my recipe.
Happy Anniversary! That is so exciting! This cake is just beautiful. I love finding recipes for cakes that are not loaded with sugar. Not an easy find! I love the olive oil in this too…I bake with it all the time and you are so right…can’t taste it at all, especially when you incorporate other flavors. The kombucha is so genius! Cannot wait to try it!
Thank you so much, and thanks for stopping by! Glad you like my recipe. You’re right, it is hard to find a good recipe for cakes that don’t contain a crazy amount of sugar! I hope you enjoy this one 🙂
What a great idea! Happy Anniversary–both of them! Must ry this one–it looks amazing.
Thank you very much Elaine Please do let me know how it went if you make it 🙂
WOW! What a stunning cake!!! I’ll definitely have to bookmark it!
Thank you! 🙂
Pinning this right now. Looks delicious. Congrats on not only another year, but on pushing forward in new directions like adding video.
Thank you! It’s never easy to move in new directions, but that’s what makes life interesting. Thanks for dropping by and for the pin!
This looks absolutely delicious (and pretty, too). Saving for later! Also, your site is gorgeous. Great post!
Thank you so much Kyla! Happy baking! 🙂
Hi!! This has been on my Pin board for ages now and I will finally be making it this weekend for a friend’s birthday. I’m vegan and I was thinking of replacing the eggs with aquafaba or yogurt. Perhaps a little extra oil as well. I often veganize recipes and these tricks work, I’ve just never baked with kombucha so I’m a little nervous of it’s behavior. Thanks! It seems it would act nicely as an acid to activate leaveners.
Hi Kyle! How did it turn out? I’m curious to know! If I make something vegan, I usually use soaked chia seeds, so I’m curious to know how yours turned out! 🙂